Thursday, June 27, 2013

Powder Room - Functional Plumbing and Hardwired Internet

Due to the fact that the sink was originally off center in the room and I installed the new one centered, we hired a plumber to do the reconnect. He cut out the existing and put in new pipes and a p-trap in the center.
While he was there, we got him to put in the faucet and the toilet. Luckily, it turns out, as the toilet needed a new higher flange which was a more complex job than expected.
While he was working in the powder room, we had another crew in the house installed wall mounted lan drops and a new cable line. Previously ours came in at the front window and got cut during the window replacement. To me, it seems like a step backwards to have wired internet, but Tom is very excited about the performance improvements (we still have wireless as well though).
In the afternoon once all the trades were gone, I cut down the vanity doors and painted them. This blue paint needs so many coats to get an even finish, at least 3 on each side. I can’t tell if it’s the colour or the paint coverage. 
Finally I did some finishing touches including touching up the wall paint and installing the towel bar and toilet paper holder. 
And now we know: another case when hiring a professional was a good choice. I chatted to the plumber about shims for toilets (the upstairs one is a little wobbly) and he said there is nothing special, I can just use regular shims…need to add that to my ‘minor repairs to do list’

Monday, June 24, 2013

Powder Room – More Grouting and Quarter Round

Now back from our weekend away, I found time to grout the remaining 4 rows of wall time. 
In the den, now that the floor is done, I installed the pre-cut quarter round.
And now we know: some of the grout on the wall and floor had cracked/shrunken a little, so I put another light layer overtop in those areas and it seems to have fixed the problem

Thursday, June 20, 2013

Powder Room Day 7: Clear Coating the Hardwood

We head out on a road trip to a wedding for the weekend, but before we left I clear coated the hardwood. 3 coats of the same Verathane I used in the kitchen. It looks awesome and will have lots of time to cure before Tom moves back into the room when we get back.
And now we know: 3 coats covered well in this lower traffic area…luckily as that was the end of the can!

Tuesday, June 18, 2013

Powder Room Day 6: Baseboards, Lighting and a New Sink

Today was my last day off work to work on this project. To start I installed the baseboards in both rooms and cut the quarter round to fit. 
I installed the quarter round in the bathroom, but will wait for the den until the finish coat is on the floors.
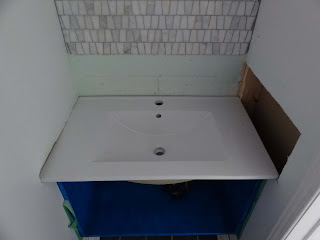
Just after lunch I got the call I had been waiting for…the new sink was in! They gave it to me at cost (apparently it shouldn’t break like that…) which was a slight consolation for the wait to get it. Installing it went better this time, meaning no breaking. It did require a slight expansion of the drywall hole, cutting off the front piece of wood on the vanity and some PL adhesive to ensure it’s never moving again. 
Once the sink was in place, I cut a new piece of drywall and patched the wall. I used my tried and true method of securing it with wood bracing in behind. 
Although the drywall mud was still wet, I wanted to get as much done as possible and got to tiling the remainder of the wall. The 4 rows went in easily and I did not even need the tile saw as I had edges pieces that magically fit. 
For the vanity, I managed to get on a couple of coats of paint. I tried this new VOC melamine imitation stuff and it smells like play dough. I’m not sure if this is an improvement. 
 Last thing on my list for the day was installing the light fixture. Easy enough and it is a hell of an improvement. When we bought it we bought bulbs to go with it…thinking ahead for once…they did not fit. Chandelier bulbs are not one size fits all.
And now we know: apparently sinks like this can vary in size. This second one was about 1/8” deeper and slightly wider too. I find this a little weird…It is a mass produced item and they post the dimension online…should they not be a little more consistent? Since the vanity was build specifically to the dimensions of the previous sink, it led to the above mentioned taking a saw to the vanity. At least it did not break. 

Monday, June 17, 2013

Powder Room Day 5: Sanding the Hardwood

Unfortunately there is not much more I can do in the powder room until that new sink comes in, so I focused on sanding down the hardwood in the den. Here was the stained carpet that I tore up earlier this week.
And here is the hardwood floor as found under the carpet.
Like when we did the floors in the kitchen, I rented a drum sander, taped off the room with plastic and got to work. It took maybe 2 to 3 hours including doing the edges with the orbital and belt sanders.
While renting the sander, I also bought more paint and finished the painting in the powder room. Some touch ups pending after I get that damn sink in and close up the drywall.

And now we know: much less stressful sanding without the husband around freaking out about dust. I was able to vacuum, remove the plastic, wash the wall and vacuum again, so that the house was clean by the time he got home. That way all he had to do was admire the lovely floors!

Sunday, June 16, 2013

Powder Room Day 4: Grouting

Although the wall tile is not complete and can’t be until that damn sink is installed, I went ahead and grouted both the wall and the floor. I figure that I might as well get as much work done as I can, even if I have to repeat steps later on. At least then those steps will be on a much smaller scale. Does that make sense? More repetition but less work each time?
Both the wall and floor are the same medium gray colour grout. Grouting is a fun task, although there are lots of steps, what with putting on the grout, waiting, wiping the grout, waiting, and then finally buffing.
Lastly, I put a coat of paint on the ceiling, same white as the walls will be and that’s on the upper cabinets in the kitchen.
And now we know: As a cost saving measure I went against general instructions and used un-sanded grout on the floor aswell as the wall. The joints are thin and it would have been an extra $25 just to use a tiny bit of the bag of grout. There was some slight cracking in the joint near the door, so once it dried I went over it again with grout to fill it in a bit more and it hasn’t cracked again. Fingers crossed!

Saturday, June 15, 2013

Powder Room Day 3: More Tiling

One of the things that bothered me most about the powder room was the crappy drywalling job that was done. At the corners you could see the tape used and there were lines in the mud from sanding or something. I started skim coating them today.
Following the mudding, I went back to tiling. The tile saw got a serious workout; I cut what felt like a million of the wall tiles into small pieces to fill in the gaps along the wall. When the tiles are already only about 2x1”, its pretty nerve racking to try and get then only ½” wide, you have to put your hand alarmingly close to the saw blade. At the top, along the ceiling, I had to cut a row of tiles on an angle to fill in the space. Surprise, surprise, the ceiling is on a rather noticeable angle in this room. 
The floor tile got finished, with the last 2 tiles at the entrance adhesived in place. 
Along the doorway, I used a metal transition strip to create a clean line. It’s a neat item; the strip is laid under the tile, so the adhesive secure it in place, and creates a metal angle along the edge of the tile. I think it looks really polished. 
And now we know: you can buy some higher end and some lower end transition strips and they make a big difference in the finished look of your project. I ended up buying 5 different types to see what would work best and returned the rest.

Friday, June 14, 2013

Powder Room Day 2: Tiling

While the guys worked on installing new windows on the front of our house, I started re-building the powder room. First thing I test fit the vanity, in order to do so I had to remove the door trim on that side, it fits very tightly in the space and doesn't even need screws to stay in place. After discovering there are no studs in that part of the room, I drilled pilot holes for the screws that would hold it up and removed it until I could get proper anchors.

Next I laid out the floor tiles and cut any that needed to be. One trip to Canadian Tire for anchors later, the vanity was back in place and screwed securely to the wall.
After hanging the vanity, I tried to install the sink. When I bought it, I knew that I would have to remove some of the drywall to get it to fit as it was ¼” wider than the room. I test fit the sink, cut off some drywall on both sides of the room and test fit again. It was tight and not sitting quite flat, so I tried to remove it. I guess it was a little stuck and I twisted it a little while I pulled…and it cracked in 2!  Sh#t. Apparently I am super strong. 
This was quite the setback. The sink goes in, then the tile goes in as it starts just above it, so without the sink, the whole project would be setback. After venting my frustration a bit, I re-grouped and decided to keep moving on the tiling. I installed a piece of wood the equivalent of 4 lines of tile up from the sink, secured it to the wall and started tiling up from there. Using only full tiles I did the wall and will go back later to add the smaller pieces needed around the sides and top.
Once the wall tile was up, I put in the floor tile that I had already laid out. Installing it went fast but I ran out of adhesive for the last 2 tiles. By this time it was about 7 pm, so I called it a day.
And now we know: those damn porcelain sinks can’t take my super strength. It will take 4 days to get a new sink in and there is now no way I can finish this project by the time I go back to work. So irritating. 

New Front Windows

Today our 2 front windows got replaced! The old ones were probably original to 1952; you had to use a stick to prop them open and some of the glass was even cracked. 
We had professionals do this work and it only took a day. They did great work and were very clean.
The house looks so much better from the front, I was worried white on white wouldn’t look good, but it is so much better than the black of the old windows.
Inside it feels much brighter without all the horizontal mullions breaking up the glass.
And now we know: the stucco originally on the house was green and white, so glad it is covered by siding. 

Thursday, June 13, 2013

Powder Room Day 1: Demolition

Now that we are back from vacation, I started working on a facelift of the powder room on our main floor. To start Tom and I removed the toilet, sink and vanity. From there I ripped out the vinyl floor and all the stuff hanging on the walls. 
As you can see the cat was very helpful with this endeavour. 
In the adjacent den, I ripped out the carpet and baseboards. Underneath was hardwood, which is awesome and it’s in good condition so even better news! I’d like to sand it down, for continuity of flooring and cost savings, Tom wants to still put the cork down, for dust savings. We’ll see which way this goes…
Since I still wanted to tile the bathroom floor, I installed a sub floor using ¼” plywood I already had on hand. This is not the ideal material for a sub floor, but is the best solution for this situation as the hardwood is already solid and a thicker material would create an extremely large height discrepancy between the 2 rooms. With the plywood and the tile the difference will be about ½”.
And now we know: so many things; there is hardwood in these rooms and they built the bathroom walls overtop. There are random metal plates in the den floor…what could it be covering, the vents are in the wall. There are special screws just for sub-floors.